Real-World ProPresenter 7 Setup for Churches with Live Streaming, Timecode, and Multitracks Integration
ProPresenter 7 has become the indispensable tool for worship environments—equipping churches of all sizes with the flexibility to deliver high-quality, engaging multimedia presentations. In this deep-dive, we explore a real-world, highly functional ProPresenter 7 setup used across nine locations by a multi-site church network. From playlists, screen routing, and automation via Timecode, to macros, themes, and integrations with Multitracks.com, Adobe Premiere, and hardware setups like Blackmagic and Decklink, this walkthrough will empower you to replicate and customize a similar system in your church.
Whether you’re in a small church or a large worship center, these strategies apply broadly and can significantly improve your media operations.
Table of Contents
- Introduction to the Setup
- Playlist Organization: Weekly Flow
- Screen Configuration and DeckLink Output
- Countdown and Announcement Loops
- Automating Songs with Timecode
- Live Stream Lower Thirds & Look Splitting
- Bumper and Sermon Slide Automation
- Stage Displays and Notes for Worship Team
- Macro and Look Integration
- Theme Creation and Management
- Audio Playlist Organization
- Media Organization in the Bin
- ProPresenter Settings
- MultiTracks and MIDI Integrations
- Summary and Suggested Extensions
1. Introduction to the Setup
This ProPresenter 7 setup is currently running version 7.1 (at the time of recording) across multiple campuses using Apple Mac Minis. Each Mac is outfitted with a Sonnet eGPU enclosure housing a DeckLink Duo 2 video card, adding four SDI outputs to support:
- Projector screens (audience)
- Live streaming (lower third w/ alpha channel)
- Stage display (band/musician info)
The setup is reliable, scalable, and tightly integrated with Multitracks.com for chord charts, lyrics, and planning.
2. Playlist Organization: Weekly Flow
There are three primary playlists used each week:
a. Production Keep
Items reused weekly:
- Countdown video
- Announcement loop
- Bumper video
- Sermon presentation
b. Songs TC (Timecode)
- Songs preprogrammed with Timecode
- All slides and macros aligned using the timeline view
- Easily sortable and triggerable via macro/stage view
c. Sunday Playlist
This contains your weekly worship flow:
- Announcement loop (pre/post service slide rotation)
- Countdown video (5 min)
- Worship Set (songs w/ Timecode)
- Live Announcements (with split looks)
- Bumper video
- Message/Sermon slides
- Final worship or closing announcements
Use this as your weekly editable flow. Having reusable assets keeps your setup tidy and saves time every Sunday.
3. Screen Configuration and DeckLink Output
Each Mac Mini outputs 5 screens:
- HDMI: Local screen preview for the operator
- Decklink 1 (SDI1): Lower third graphics
- Decklink 2 (SDI2): Alpha channel (for keying lower thirds over livestream feed via Blackmagic ATEM switcher)
- Decklink 3 (SDI3): Projector screen for audience
- Decklink 4 (SDI4): Stage display for musicians using a TV
Step-by-Step: Configure Screens
- Go to “Screens” > “Configure Screens”
- Assign each screen by label (e.g., “Projector,” “Lower Third Alpha”)
- Set appropriate resolutions and color channel
- Output through Decklink Duo SDI ports
- Test outputs in “Preview” windows
4. Countdown and Announcement Loops
Creating an Auto-Looping Announcement Slide Show:
- Import all your announcement slides into one presentation
- Right-click each slide > Set “Go To Next Timer” to 10–12 seconds
- On the last slide, check “Loop to Beginning”
- Attach a macro on the first slide to trigger background music and select a proper look
Countdown Video Slide:
- Add the countdown video as a foreground video
- Attach a macro to:
- Trigger a “video” look
- Send appropriate layers to screens
- Start countdown timer for stage team
Add a “Go To Next Timer” of “0” to let ProPresenter auto-advance to the sermon once the video ends.
5. Automating Songs with Timecode
Songs are automated via Timecode using ProPresenter’s Timeline view.
Step-by-Step: Automate Your Song
- Click “Timeline Mode”
- Record Timecode markers aligned with song cues
- First layer: Slide cues (lyrics)
- Second layer: Motion backgrounds (if used)
- Third layer: Macros (e.g., lighting via MIDI)
- Test automation with Multitracks Playback app
Advantages:
- Consistent lyric display
- Synchronization with lighting and media
- Hands-free operation during service
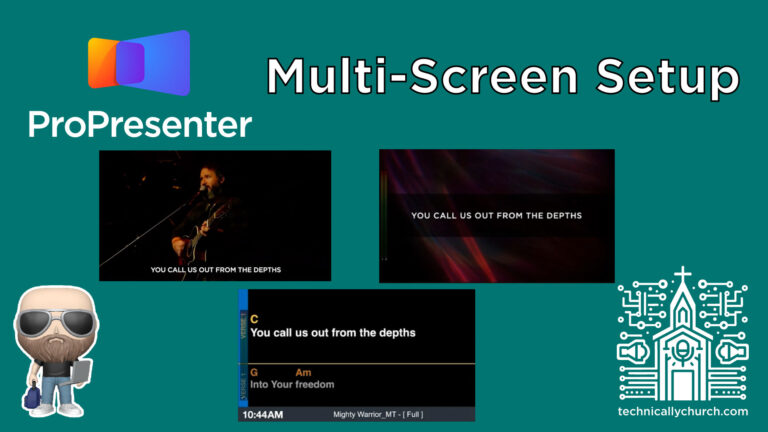
6. Live Stream Lower Thirds & Look Splitting
Through the use of ProPresenter “Looks,” you split a single slide into two display layers:
- Projectors: Show full-screen graphics
- Lower Third Alpha: Show stripped-down lower-third text
Example Use Case: Announcements
- Add full-screen slide
- Add semi-transparent lower third box with text
- Apply a “Look” that:
- Sends slide layer to Lower Third screen
- Sends media layer to Projector screen only
This technique is essential for livestreaming with layered visuals.
7. Bumper and Sermon Slide Automation
Bumper Video Setup:
- One slide containing the video
- Macro to:
- Trigger sermon series graphic look afterwards
- Reset stage timer
- Auto-advance with a zero-second “Go To Next Timer”
Sermon Setup:
- Slide one: Resets timer and waits 5 seconds
- Slide two: Applies LOOK macro
- Bible verses are added weekly with blank slides to signify breaks
Step-by-Step: Add Scripture
- Use ProPresenter’s built-in Bible tool
- Select verses
- Click “Save As” > “Copy to Selected Presentation”
- Use blank slides between sections visually to cue operator
8. Stage Displays and Notes for Worship Team
Customized stage themes make your team more effective.
Stage Displays Used:
- Worship View: Current lyrics, next lyrics, chord chart (from Multitracks)
- Sermon View: Current slide preview, next slide, sermon timer
- Announcement View: Projector preview (left), slide notes (right), clock
- Video View: Video preview with timer countdown
Use the “Stage Editor” under “More” to customize layouts. Add timers, clocks, current and next slides via the + menu.
9. Macro and Look Integration
Macros execute multiple actions (set looks, trigger playlists, etc.).
Sample Macro: “WORSHIP-MT”
- Applies Worship LOOK
- Clears previous slides
- Sends Chords and Lyrics theme to stage
- Starts audio playlist (if needed)
To apply a macro:
- Drag macro from the macro panel onto the first slide
- Save presentation
This makes your weekly setup repeatable and fast.
10. Theme Creation and Management (Slides and Stage)
Slide Themes:
- Worship Lower Third: 3 lines, transparent black box
- Worship Full: Center screen, white text, semi-transparent black box
- Sermon Lower Third: Scripture + transparent design
- Sermon Full: Scripture on top of sermon series artwork
Visibility Rule:
For lower third graphics, apply:
- “Only display if Verse Text has text”
This prevents background graphics from showing during blank slides.
Build your own in the Theme Editor > Save under a custom category.
11. Audio Playlist Organization
Under the Audio tab:
- Pre/Post Music: Pre-made list with 2-sec crossfade
- Event Specific (e.g., Funeral Pre/Post)
- Add songs by drag-and-drop
- Control playback via macros embedded in slides
12. Media Organization in the Bin
Media is grouped logically:
- Default: Misc assets
- Motion Backgrounds
- Announcements
- Sermon Series Media
- Random or event-specific bins
Drag items in during prep week and keep naming consistent.
13. ProPresenter Settings
Important settings:
- Auto-update notifications: Disabled (to avoid accidental updates)
- Accounts: Mac users set as non-admin
- Ignore background colors: ON (avoids accidental overrides)
- Network: Enabled (ProRemote app + Companion automation support)
- Inputs/Media: Not used (video switching handled externally)
- MIDI Setup: Used for lighting and automation
14. MultiTracks and MIDI Integrations
- Logged in via ProPresenter Integrations panel
- Lyrics and chord charts downloaded directly
- Stage Templates (chords/lyrics) are applied via macro
- Multitracks Playback uses arrangements, which eliminates need for multiple song arrangements inside ProPresenter
Optional:
- MIDI cues embedded in ProPresenter Timeline automate lighting via software like LightKey or DMX-controlled systems.
15. Summary and Suggested Extensions
What’s included in this ProPresenter setup:
- Multifunctional automation with macros and Timecode
- Multitrack integration for lyrics and chords
- Chord chart stage views
- Decklink-powered live streaming with alpha keys
- Single-slide sermon automation
- Lower third and full-screen split looks
- MIDI integration
- Volunteer-proof settings