How to Build and Run a Show on the Behringer Wing
The Behringer Wing is a powerful digital audio console that offers incredible flexibility for live sound mixing, particularly in environments like houses of worship. One of the most efficient ways to streamline your workflow and ensure consistent results is by building and using a “Show.” Shows on the Wing consist mainly of snapshots and can also include snippets and audio files. In this article, we’ll walk through the end-to-end process of building a show on the Behringer Wing and show you how to execute it live — ensuring a professional and seamless audio experience.
What Are Shows, Snapshots, and Snippets?
Let’s revisit some key concepts before diving in:
- Snapshots: Full console states, including fader positions, EQ settings, routing, and more. Perfect for saving a customized mix for each song.
- Snippets: Partial parameters or settings that can be changed independently of a full snapshot (e.g., you may only want to change effects settings or routing without loading an entire snapshot).
- Shows: A collection of various cues (snapshots, snippets, and media) organized in a sequential list ready for live execution.
In this guide, we’ll be dealing primarily with snapshots placed inside a show.
Step-by-Step: Building a Show on the Behringer Wing
Step 1: Prepare Your Snapshots
Before you can build a show, you need to create your snapshots.
- On the Wing console, press the Library button.
- Navigate to Internal > Songs.
- Create a folder if necessary to organize your songs.
- For each piece of music performed by the band, configure your ideal mix manually.
- In the Library, choose Add Snapshot and save the current state of the console.
- Name each snapshot appropriately (e.g., “1st Song”, “2nd Song”, “3rd Song”, etc.).
- Repeat for each song or mix state you want included in your eventual show.
💡 Tip: Treat each snapshot like a ‘scene’ in a play. Each one recalls instrument levels, EQ, FX sends, and more tailored to that specific moment or song.
Step 2: Create the Show
Now that your snapshots are ready, you can build your show.
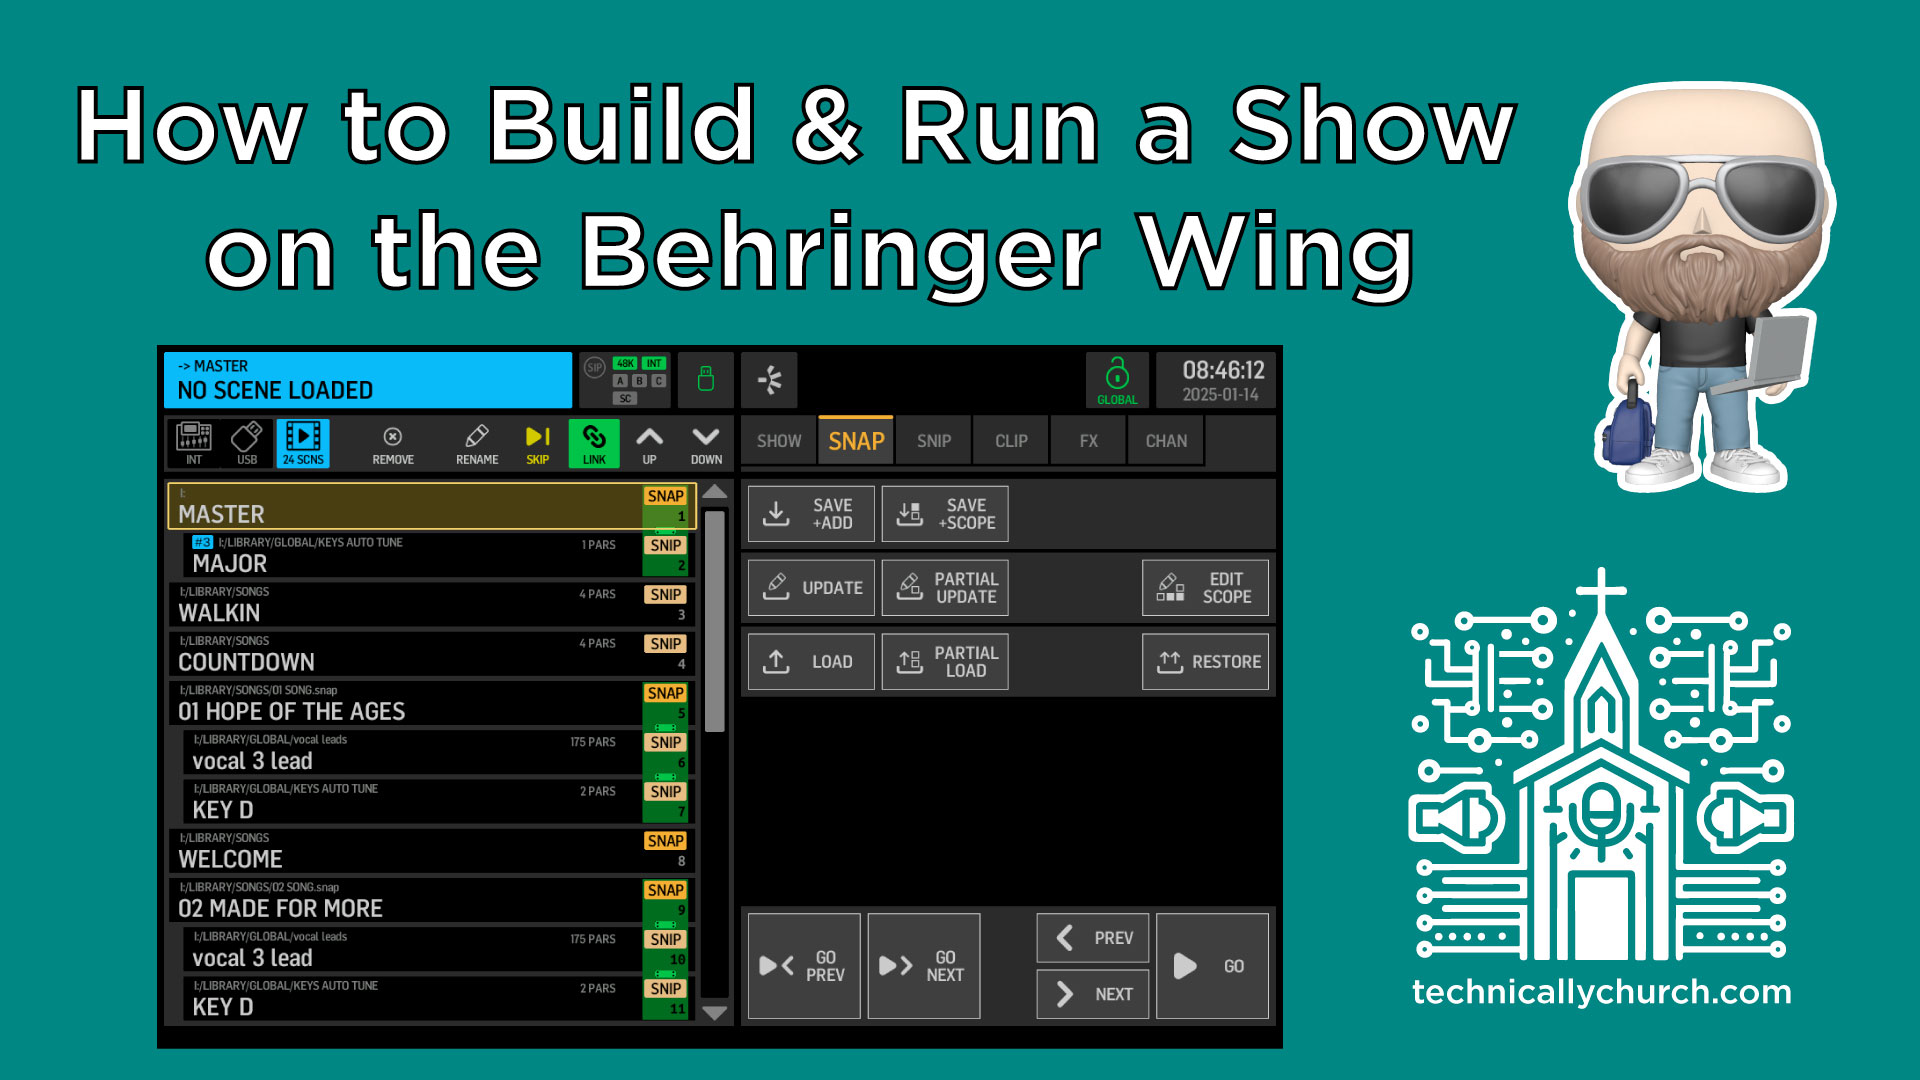
- From the console screen, return to the Library, then navigate to Show mode.
- Go to your Shows folder (or create one for organization).
- Click Create to start a new show.
- Give the show a descriptive name (often today’s date, service type, or event title).
- You’ll now have a blank show with “0 Scenes”.
Step 3: Add Snapshots to the Show
- Return to Internal > Songs section.
- Select your first snapshot (e.g., “1st Song”) and click Add. This adds it to the current show.
- Repeat this for each subsequent snapshot — “2nd Song”, “3rd Song”, etc.
- Once added, you can reorder them if needed: select a snapshot, use the context menu or drag-and-drop to move it up or down the list.
Step 4: Save the Show
Always save your work.
- Go back to your Shows view.
- Click Save to ensure all snapshot references and orderings remain intact.
This prevents losing your structure due to power failure or accidental shutdown.
Step 5: Mixing and Updating Snapshots
Now that your show is built, you may want to dial in the mixes for each song and commit those adjustments to the appropriate snapshot.
- Select the snapshot for a song from your show list.
- Adjust your mix on the console (levels, EQ, effects, etc.).
- Once satisfied, return to the snapshot list and click Update for that snapshot.
- Confirm the update when prompted.
Repeat this for each song, ensuring that each snapshot reflects the mix you want during a live performance.
Running the Show: Execution and Control
You’re now ready to run your show live using the Show Control section of the Wing.
- Navigate to the Show Control tab on the screen or control surface.
- You will see three primary buttons: Previous, Next, and Go.
- Use Previous/Next to navigate through your show’s snapshots.
- Use Go to activate (load) the selected snapshot onto the console.
- Practice stepping through your songs — each press of Go will transition your console settings instantly to the stored mix for that song.
💡 Tip: This functionality is perfect for worship services and concert-style events where consistency and timing are crucial. It allows the tech team to focus on the room, not on recalling complicated mix settings manually.
Final Thoughts
Using snapshots and shows on the Behringer Wing transforms your workflow from reactive to proactive. It gives you flexibility, precision, and repeatability — essential qualities in a live production environment. Once you’ve created your shows and refined them with proper updates, running sound during a live worship service becomes vastly simpler and more controlled.
As you get more comfortable, consider expanding your workflow to include snippets for smaller changes, or even audio media to add walk-in music or transition cues to the show.