Mastering Tap Points on the Behringer Wing: A Step-by-Step Guide for Efficient Monitor Mixes
In the world of live audio mixing, especially in environments like churches where live sound, streaming, and in-ear monitoring coexist, understanding how your digital mixer routes audio is crucial. One of the most powerful features of digital consoles like the Behringer Wing is the ability to precisely control the tap point—that is, the specific place in a signal chain where audio is picked off and sent to another destination, such as a bus for in-ear monitors (IEMs). Proper use of tap points can greatly improve the clarity of a monitor mix or maintain consistency with front-of-house (FOH) EQ settings.
This article walks you through what a tap point is, how it differs from the more commonly known pre/post-fader routing, and gives you a detailed, step-by-step tutorial on how to adjust it directly on the Behringer Wing.
🧠 What is a Tap Point?
A tap point refers to the location within a channel’s signal path from which an audio signal is “tapped” or routed to another location—like an auxiliary bus for monitor sends, effects, recording, or broadcast. Each channel in a digital mixer processes audio through various modules such as:
- Gate
- Insert FX racks
- Equalizer (EQ)
- Compressor
- Fader
The tap point decides whether the signal sent to a bus will include processing like EQ or compression, or be a cleaner version of the source before that processing.
On traditional consoles, this concept is usually simplified as:
- Pre-fader: Signal tapped before the channel fader
- Post-fader: Signal tapped after the channel fader
Behringer Wing expands on this, allowing pin-point accuracy by letting you choose exactly where in the processing chain to place the tap.
🎛 Step-by-Step: How to Adjust the Tap Point on the Behringer Wing
Let’s walk through how to adjust this setting, using a vocal microphone channel as an example.
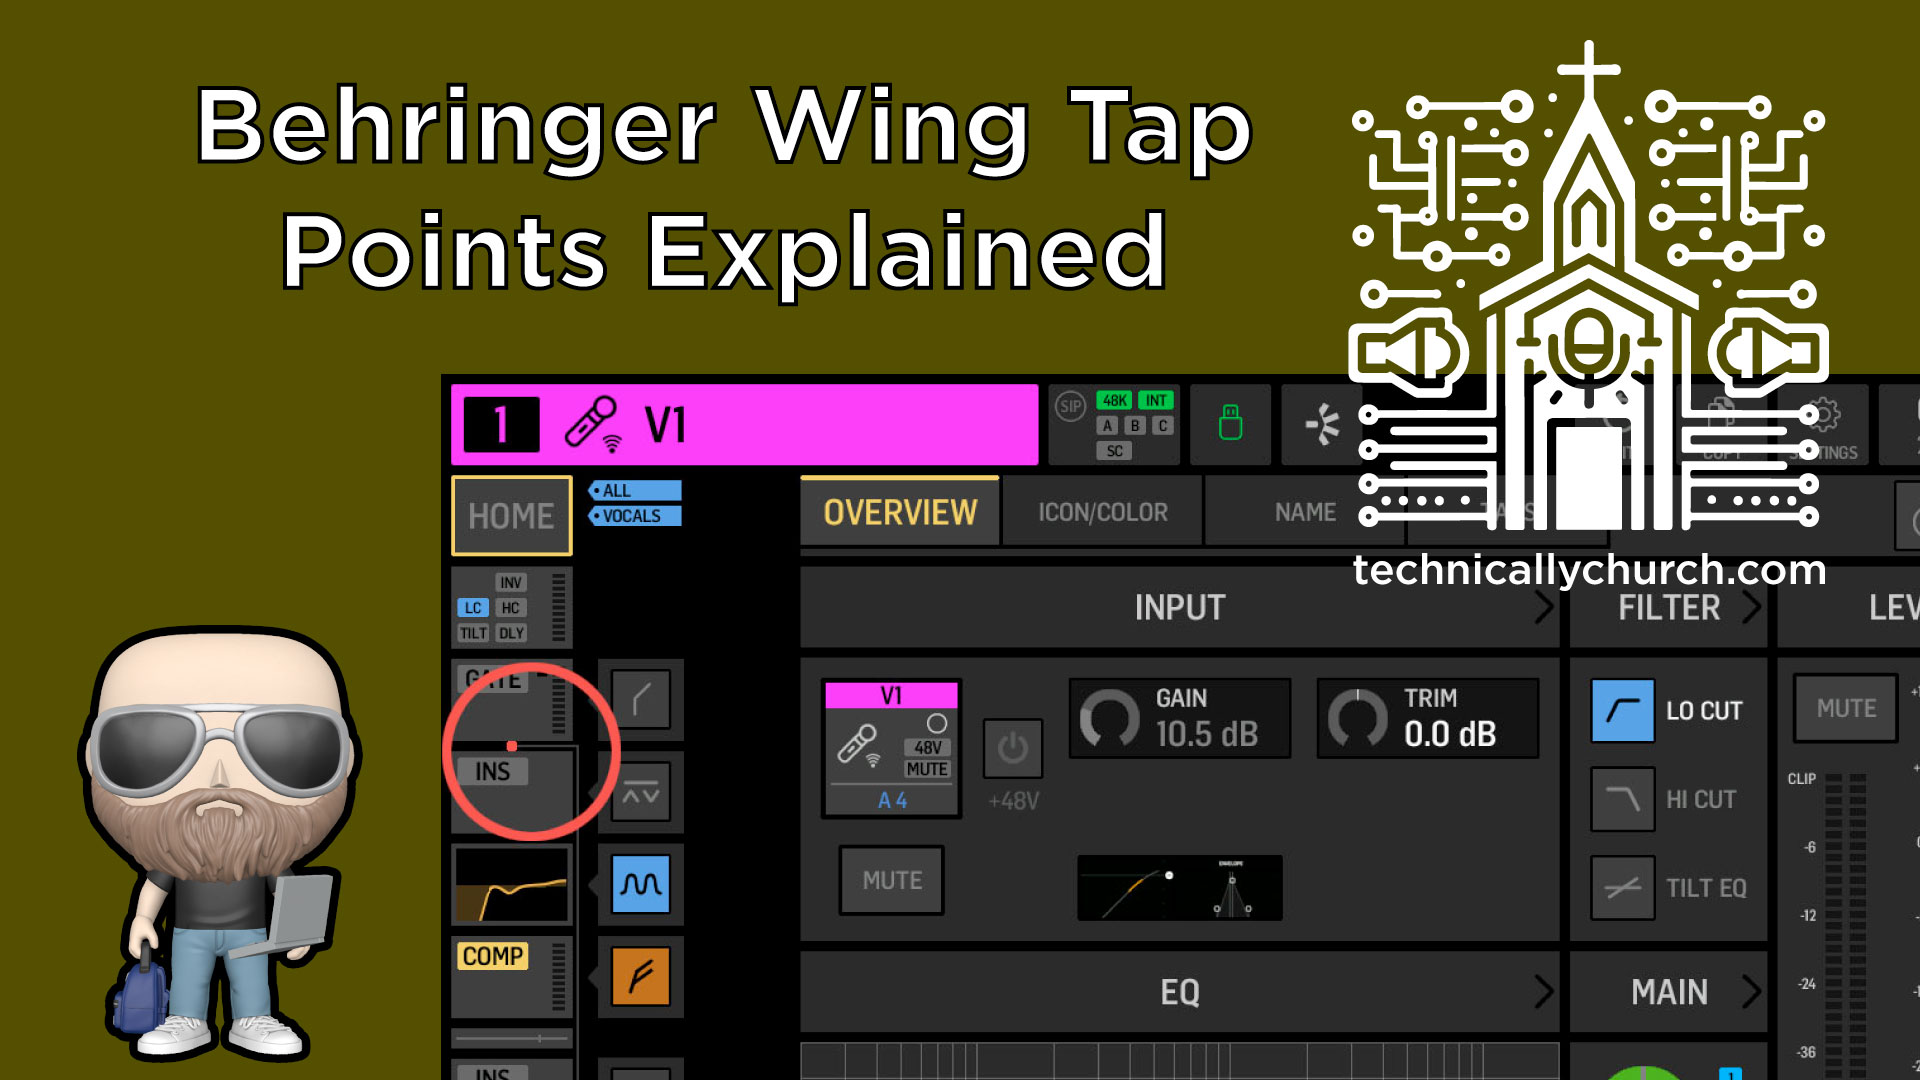
1. Access the Channel View
- On the Behringer Wing’s touchscreen, navigate to the Home screen for the channel you’d like to adjust. For example, choose Channel 1 for a lead vocal mic.
2. Locate the Signal Flow Path
- On that screen, you’ll see a visual representation of the signal chain. Key modules will be displayed in order:
- Gate
- Insert Rack 1
- EQ
- Compressor
- Fader
- Insert Rack 2
- Main Output
3. Find the Tap Point Marker
- Look for a small red dot along the signal path. This dot represents your current tap point. It’s where the signal is being “tapped off” for buses like in-ear monitors or effects sends.
4. Open Tap Point Editor
- Tap the wrench (settings) icon at the bottom of the screen to unlock tap point editing mode.
5. Adjust the Tap Point
Once enabled, you can drag the red dot to various positions in the chain:
- Before or after Gate
- Before or after EQ
- Before or after Compressor
- Before or after Fader
- Before Insert Racks 1 or 2
Example scenario:
- If you want your monitor mix to reflect tonal changes from EQ but not changes to fader level, place the tap point after EQ but before fader.
6. Lock In the Tap Point
- Once you’re satisfied, click the wrench icon again to save your selection and lock the setting.
⛔ Note: Tap points are per channel, meaning you can assign a different tap point for each input individually, giving you extreme flexibility in customizing your bus mixes.
🔁 Bus Settings: Per-Channel or Global?
When you’re working with a bus, such as an in-ear monitor bus, the Behringer Wing offers more flexibility in terms of how channels are routed.
- Navigate to your IEM Bus
- Open the Bus Settings
Here, you can set the receive mode to:
- Post (traditional post-fader)
- Tap (respects per-channel tap points)
Choosing Tap means the console will use the specific tap point you manually configured on each individual channel. This is ideal if, say, a vocalist wants to hear compression and EQ in their IEMs, while your drummer wants the raw signal with no processing.
🎯 Real-World Applications in Church Settings
- In-Ear Monitors (IEMs): Set tap point after EQ but before fader to prevent changes in FOH fader levels from impacting musicians’ monitoring.
- Livestream Mixing: Use a tap post-dynamics but pre-fader to ensure a newly mixed livestream bus isn’t thrown off by FOH level changes.
- Recording Feeds: Set it absolutely pre-processing to get a clean, dry multitrack recording for post-production editing or virtual soundchecks.
🌟 Pro Tips
- Setting consistent tap points across vocal channels going to a vocals-only monitor mix helps create a coherent and polished listening experience for vocal teams.
- If your sound techs are rotating volunteers, consider standardizing your tap point strategy in a saved scene or snapshot for consistency and ease of training.
- When changing tap points mid-show or mid-service, caution is advised—adjustments affect the audio routing live and can be disruptive.