Behringer Wing Low Cut Filter Explained! | Quick & Easy Guide
When working with live sound in a church or any other environment, properly managing frequencies is essential to achieving a clean and professional mix. One tool that helps with this is the Low Cut Filter, also known as a High Pass Filter (HPF) on some consoles. On the Behringer Wing, this feature can be found in the Filter Section, alongside the High Cut Filter.
In this article, we will explore what the Low Cut Filter does, how to use it properly, and when to apply it to different instruments and voices to shape your mix effectively.
What is a Low Cut Filter?
A Low Cut Filter eliminates low-frequency content below a selected frequency point. This helps remove unnecessary low-end rumble, stage noise, or mic handling noise, leading to a cleaner mix.
On some consoles, this feature is labeled as a High Pass Filter (HPF). Both terms refer to the same function – allowing higher frequencies to pass through while cutting lower frequencies.
Conversely, a High Cut Filter does the opposite: it removes everything above the selected frequency point, primarily used for rolling off high-end frequencies when needed.
Using the Low Cut Filter on the Behringer Wing
The Behringer Wing makes adjusting Low Cut and High Cut Filters easy through its user-friendly interface. Follow these steps to engage and modify the Low Cut Filter:
Step 1: Activate the Low Cut Filter
- Select a Channel – Choose the input channel for which you want to apply the Low Cut filter.
- Open the Filter Section – On the touchscreen or using the console UI, navigate to the Filter section, where you’ll see both the Low Cut and High Cut options.
- Enable the Low Cut Filter – Activate the Low Cut by selecting it.
Step 2: Adjust the Low Cut Frequency
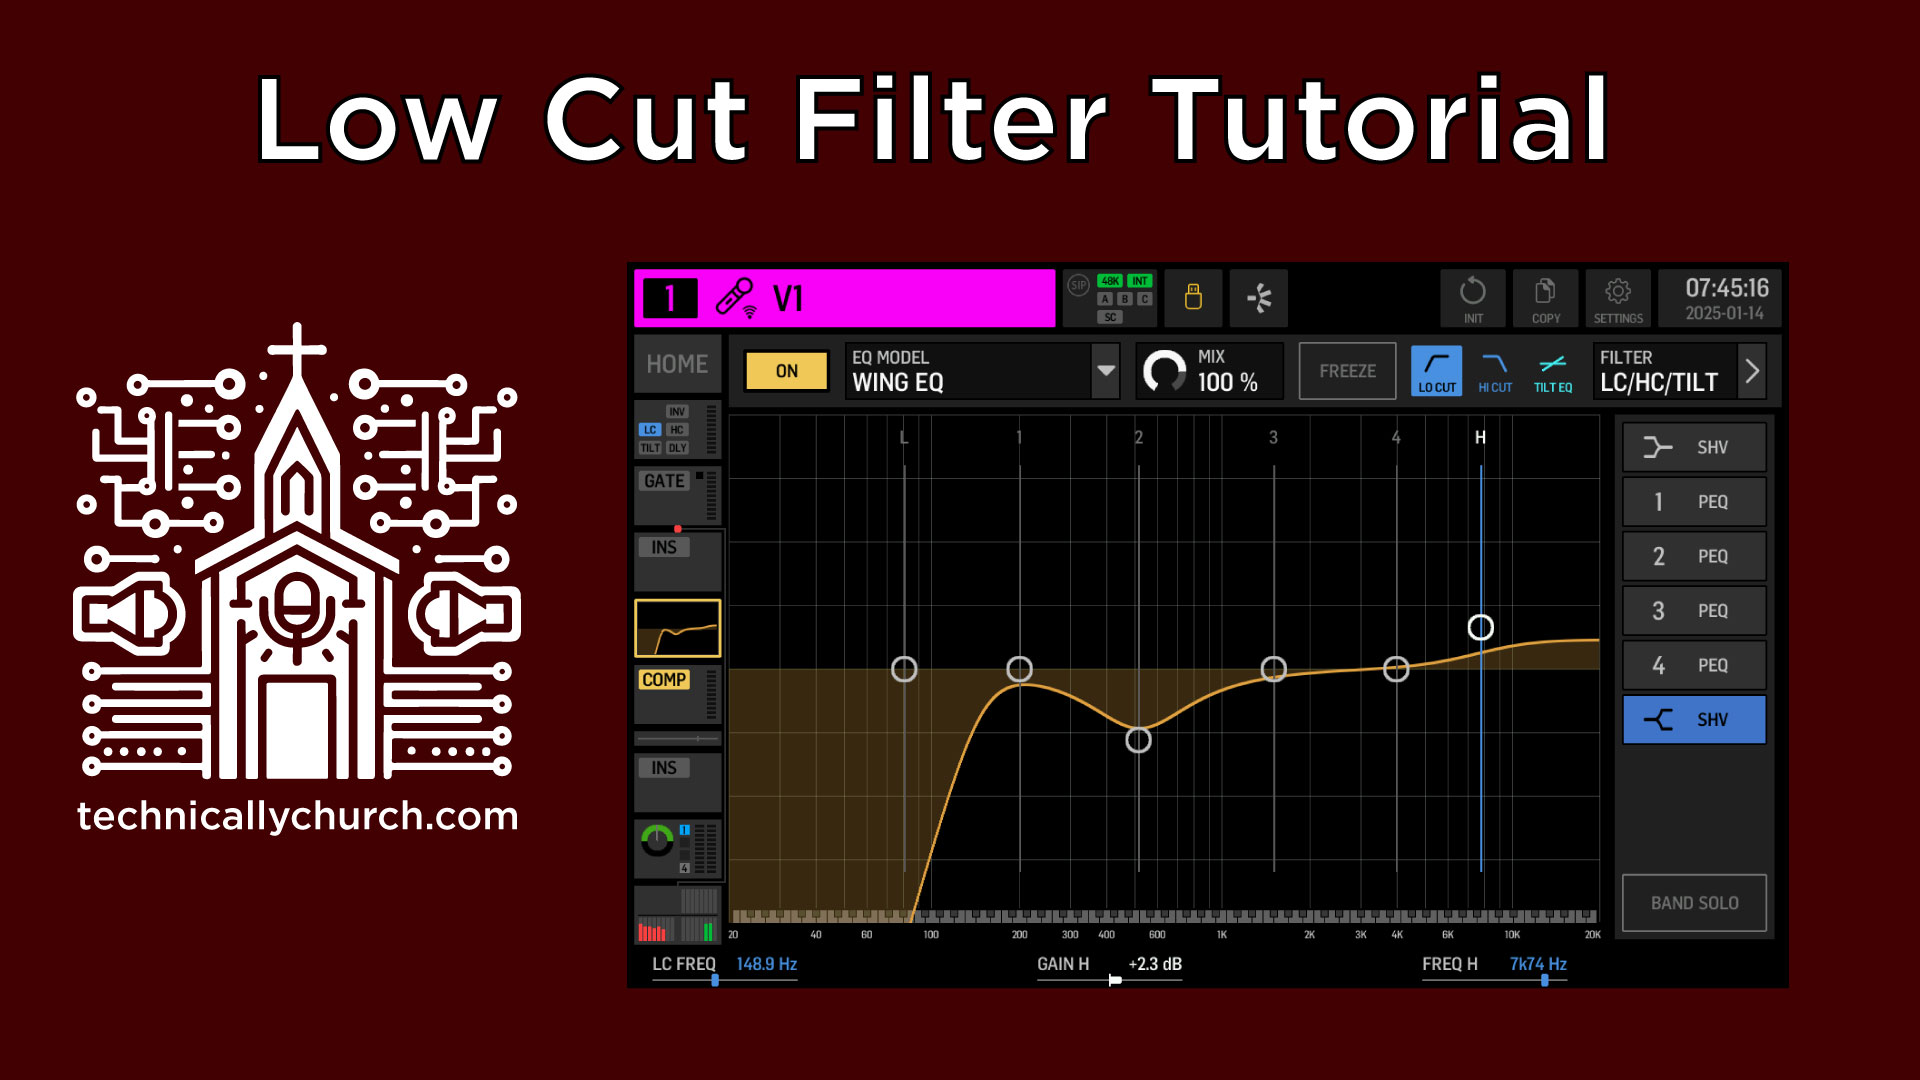
- Once activated, open the Equalizer (EQ) Section to visually monitor how the filter is affecting the signal.
- Locate the Low Cut Frequency control at the bottom of the EQ display.
- Adjust the frequency by turning the encoder or using the touchscreen.
- You’ll notice a steep curve forming at the selected frequency, cutting everything below that point.
Example: If you set the Low Cut at 600Hz, all frequencies below 600Hz will be significantly reduced, helping to clean up unwanted low-end noise.
When to Use the Low Cut Filter
Using the Low Cut filter appropriately ensures a balanced mix without unnecessary low-frequency buildup. Here’s a guide on when and where to use it:
Vocals
- Apply a Low Cut around 80-120Hz to remove rumble and plosive sounds.
- Female vocals may require a slightly higher cut (100Hz-150Hz), depending on their tonal characteristics.
Acoustic Guitar
- Cut around 80Hz-120Hz to remove boominess while maintaining body.
- For a thin mix, a higher cut around 150-200Hz can make the guitar sit better.
Electric Guitar
- Typically, remove frequencies below 100Hz to make space for bass and kick drum.
Keyboard and Pads
- Depending on the keyboard sound or pads, a Low Cut around 60Hz-100Hz can help clear up the mix.
Bass Guitar & Kick Drum
- Avoid extreme Low Cuts on bass-heavy instruments, but filtering under 30Hz-40Hz can remove unnecessary subsonic noise.
Overhead and Room Mics
- To avoid low-end mud, apply a Low Cut around 120Hz-200Hz depending on how much low end you want to retain.
Final Thoughts
Understanding how to use Low Cut Filters on the Behringer Wing is crucial for achieving a clean, clear, and professional mix. This simple adjustment removes unnecessary low-end frequencies, helping you focus your mix and eliminate muddy tones that can clutter the sound.
By applying Low Cuts appropriately, you will improve clarity, create balance, and ensure every instrument and vocal sits properly in the mix.