Adobe Audition and Waves Plugins: Troubleshooting & Installation Tips!
How to Get Waves Plugins Working in Adobe Audition on Your MacBook: A Step-by-Step Guide
If you’ve recently purchased Waves plugins and are looking to integrate them with Adobe Audition on your MacBook, this guide will walk you through each step. Whether you’re a seasoned audio engineer or a beginner just diving into digital audio workstations (DAWs), this tutorial will help you set up and utilize Waves plugins to enhance your audio projects.
Step 1: Download and Install Waves Central
Before you can use Waves plugins within Adobe Audition, you need to install them on your computer using Waves Central, which is Waves’ dedicated application for managing their plugins.
- Download Waves Central: Visit the Waves website and download the Waves Central application if you haven’t already.
- Install Waves Central: Follow the prompts to install Waves Central on your MacBook.
Step 2: Install Your Purchased Waves Plugins
Once Waves Central is installed, use it to install the plugins you’ve purchased.
- Open Waves Central: Launch the Waves Central application.
- Log In: Ensure you are logged into your Waves account. You should use the same credentials you used when purchasing the plugins.
- Navigate to Install Products: Start from the home screen of Waves Central, then navigate to the “Install Products” section.
- Select Your Plugins: Here, you’ll see a list of all the Waves plugins you have purchased.
- Install Plugins: Select the plugins you wish to install and follow the prompts to install them on your computer.
Step 3: Restart Adobe Audition
For the changes to take effect, you should restart Adobe Audition. This helps the software recognize the newly installed plugins.
- Close Adobe Audition: If you have Adobe Audition open, save any work and close the application.
- Reopen Adobe Audition: Open Adobe Audition again to refresh its settings.
Step 4: Verify Plugin Installation in Adobe Audition
Now that your plugins are installed, ensure that Adobe Audition recognizes them.
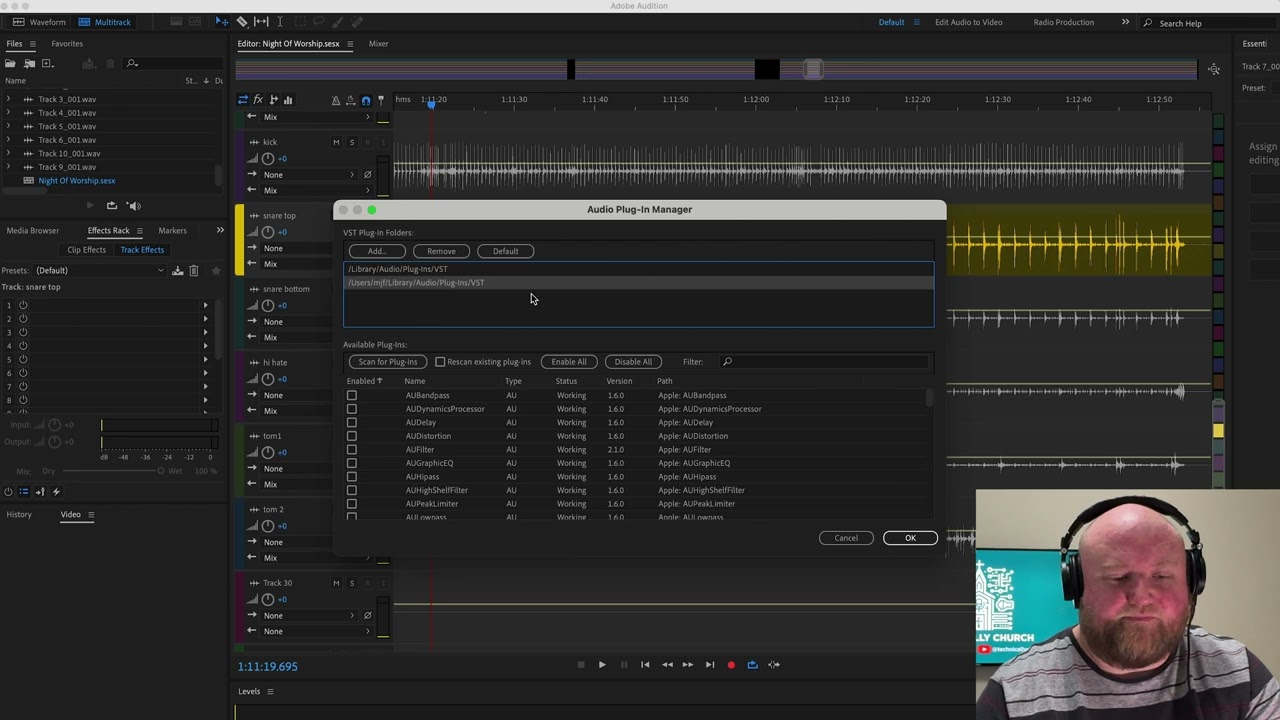
- Go to the Effects Menu: In Adobe Audition, navigate to
Effects>Audio Plug-In Manager. - Check Plugin Locations: Make sure the location where the Waves plugins are installed (usually VST or VST3 folders) is listed in the plugin manager.
- If the location is not listed, add it manually by clicking “Add” and navigating to the folder where the plugins were installed.
- Scan for Plugins: Click “Scan for Plugins” to update the list of available plugins.
Step 5: Access Waves Plugins in Adobe Audition
After verifying that Adobe Audition recognizes the plugins, you can now use them in your projects.
- Open the Effects Rack: Go to the
Effects Rack, which you can find in either the Multitrack view or the Waveform view. - Add an Effect: Click on an empty slot in the Effects Rack to add a new effect.
- Locate Waves Plugins: Scroll down to the bottom of the list. You should now see
VSTorVST3as options, depending on your installed plugin version.- Waves plugins will be categorized under VST or VST3 folders, based on their format.
- Select a Plugin: Click on the desired Waves plugin to add it to your track or audio file. For instance, if you have a Waves Auto-Tune plugin, you might find it under
Pitch Shift>Waves>Waves Tune Real-Time. - Adjust Plugin Settings: Once the plugin is added, a window will pop up with all the settings for that plugin. You can now tweak the settings to suit your needs.
Tips for Using Waves Plugins in Adobe Audition
- Organize Your Plugins: If you have many plugins, organizing them by category in the VST or VST3 folders can help streamline your workflow.
- Save Presets: Once you find settings that work well for you, save them as presets within Adobe Audition or the plugin interface itself. This will save time in future projects.
- Experiment with Chains: Adobe Audition allows you to chain multiple effects together. Experiment with different Waves plugins in combination to create unique sound effects and enhance your audio production quality.
Conclusion
Integrating Waves plugins with Adobe Audition on your MacBook can significantly enhance your audio editing and mixing capabilities. By following the steps outlined in this guide, you’ll have access to a powerful suite of tools that can elevate your audio projects to the next level. Happy mixing!