Unlock the Hidden Spectrum Analyzer on Your Behringer Wing!
How to Enable and Configure the Spectrum Analyzer in the Behringer Wing EQ Section
A spectrum analyzer is an essential tool for live sound engineers, helping to visually identify frequencies that may need adjustment. The Behringer Wing mixing console includes a built-in spectrum analyzer within its EQ section, but it isn’t always enabled by default. Understanding how to activate and configure the spectrum analyzer properly can greatly enhance your ability to mix audio effectively. In this guide, we’ll walk step-by-step through the process of turning on, adjusting, and optimizing this tool for the best possible results. Want to dig in deeper with an RTA mic? Check out this one from dbx.
Accessing the Spectrum Analyzer in the Behringer Wing
Select a Channel with Audio Input:
- Start by selecting a channel that actively has an audio source routed to it, ensuring that the analyzer will detect signal.
- In this example, we’ll use a computer channel.
Navigate to the EQ Section:
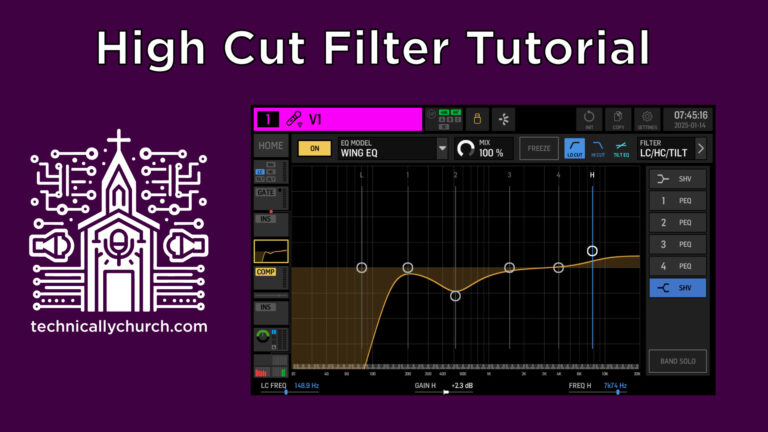
- On the Home Screen, you’ll see the EQ section displayed, but by default, the spectrum analyzer will not be visible.
- Tap the EQ tab to open the full EQ screen, where additional settings are available.
Enabling and Configuring the Spectrum Analyzer
1. Understanding Why the Analyzer May Not Be Visible
Several settings could prevent the spectrum analyzer from appearing:
- No active audio is feeding into the channel.
- The spectrum analyzer is set to “Low,” making its display very faint.
- The spectrum analyzer is disabled entirely in settings.
2. Adjusting the Spectrum Analyzer Display
To enable and adjust the analyzer:
Open the EQ Section Settings:
- Inside the EQ window, locate the Settings button and tap it.
Locate the Spectrum Analyzer Size Mode:
- In the Settings Menu, look for the option labeled “Size / Mode” (which may not be immediately intuitive).
- This setting controls how much space the spectrum analyzer occupies on the EQ window.
Choosing a Display Mode:
You have multiple options for displaying the analyzer:
- Off – No analyzer is shown.
- Quarter (¼) – The analyzer takes up 25% of the screen.
- Half (½) – The analyzer occupies half of the EQ screen.
- Overlay (OVL) – The analyzer is overlaid on top of the EQ for maximum screen usability. (Recommended)
- Overlay Divided by Three (OVL 3) – The overlay is slightly divided for a smaller footprint.
Recommended Setting: Select Overlay (OVL) to integrate the spectrum visually into the EQ while keeping full access to your EQ controls.
- Confirm and Exit:
- Once you’ve selected the desired mode, exit the settings to see the spectrum analyzer in action.
Adjusting Analyzer Sensitivity (Fixed Gain Setting)
After enabling the spectrum analyzer, you might find that the visual feedback is too faint or too intense. This happens because the analyzer gain might be set too low.
To adjust:
Return to Settings in the EQ Screen.
Locate the Fixed Gain setting.
- This setting controls the strength of the frequency display in the analyzer.
Increase or decrease the value to highlight frequency peaks effectively.
- A value around 38 dB will make the spectrum significantly more visible for demonstration purposes.
- For normal use, adjust to a level where the frequency response is clearly visible without over-exaggeration.
How the Spectrum Analyzer Helps with EQ Adjustments
With the analyzer enabled, you can now see where frequencies are peaking or dipping in real-time.
- Identify frequency build-ups: If you see a consistent peak at a certain frequency (e.g., 2 kHz), it might be a good idea to notch it down slightly.
- Visual EQ Corrections: Instead of solely relying on your ears, the analyzer visually indicates problem areas, serving as a reference point for making critical EQ adjustments.
For example:
- If there’s a harsh peak in the 4-6 kHz range (which can be fatiguing to the ears), use a narrow Q cut to reduce that peak by a few dB.
- If the low-end around 100-200 Hz is overwhelming and muddy, gently reduce it.
Final Thoughts
The built-in spectrum analyzer on the Behringer Wing is a highly useful tool when used correctly. However, many users are unaware of its existence or unsure how to enable it. By following these steps, you can ensure that the spectrum analyzer is displayed in a way that best suits your workflow, helping you make more informed EQ decisions.
For best results, set the display mode to Overlay (OVL) and adjust the Fixed Gain to an appropriate level for visibility. This tool doesn’t replace critical listening, but it acts as a guide for pinpointing problematic frequencies so you can apply EQ adjustments effectively.
Now that you know how to turn it on and configure it, take advantage of this feature to enhance your live mixes! Check out my entire tutorial series on the Behringer Wing, and also my free downloadable resources.