Mastering Gain Staging and Sound Check for Church Audio
A great mix starts before you ever touch your faders. One of the most critical and often overlooked practices in live sound, especially in a church environment, is setting proper gain during your sound check. Whether you’re running front of house, live streaming, or managing in-ear mixes, mastering gain structure is vital to achieving clean, consistent, and manageable audio. In this article, we’ll explore why setting gain is crucial, how preamps work best at nominal levels, and how improper gain affects every other part of your mix—from faders to EQs to personal monitors.
Why Gain Staging Matters
When training volunteer sound engineers in a church setting, one of the first principles I emphasize is this: set your gains first—always. Sound checks aren’t just about making sure the band is heard; they’re where you establish the foundation for your entire mix. Without proper gain staging, every aspect of your mix suffers—channel balance, effects, dynamics processing, and especially monitor mixes.
Understanding Preamps and Nominal Gain
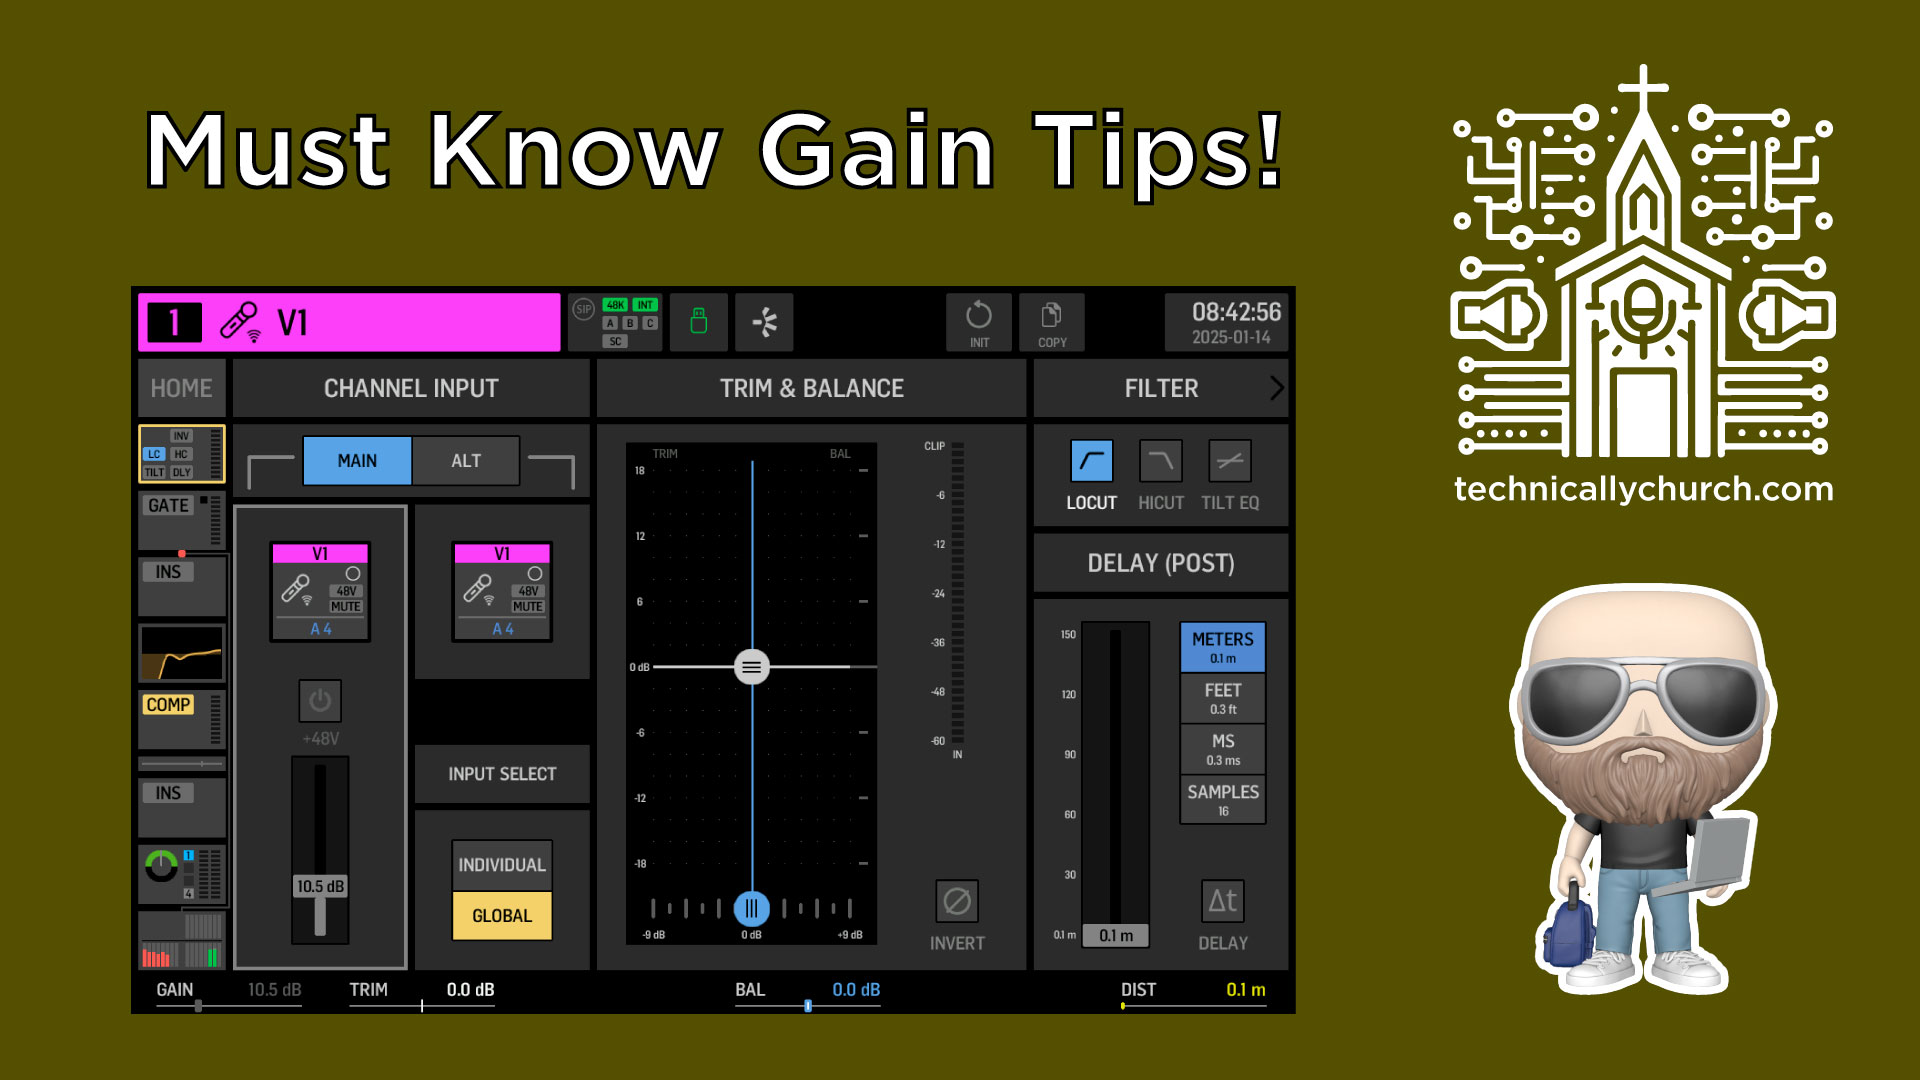
Every input on your console runs through a preamp. The preamp’s job is to take a weak microphone or instrument signal and bring it up to a level that can be processed and mixed effectively. However, each preamp has an optimal range where it operates best—this is called nominal gain.
Nominal gain isn’t a fixed value across all consoles, but on most boards—including the Behringer Wing—it’s visually represented where the green meets the yellow on the input meter. Green typically means “safe,” yellow indicates a strong signal nearing the upper limits, and red is clipping—something you always want to avoid.
Pro Tip: A great visual indicator of correct gain is seeing consistent signal peaks just hitting the transition between green and yellow when the instrument or vocal is played at a normal performance level, not whisper quiet or over-hyped.
If you don’t set your gain high enough, you may compensate by pushing the fader up or boosting with EQ later. This can lead to distortion, noise, or unbalanced mixes. Likewise, too much gain causes clipping and destroys the integrity of your signal. So, under- or over-gained channels simply do not sound good and will fight you throughout your entire mix session.
Step-by-Step Guide to Performing a Proper Sound Check and Gain Staging
Let’s walk through how to perform a professional-level sound check using the Behringer Wing, though these concepts apply universally.
Step 1: Perform a Line/Instrument Check
- Have each musician or vocalist play/sing at their normal performance level, not passively.
- If necessary, ask for a louder extended section or a few bars of a song they feel confident in.
Step 2: Set Initial Gain Using the Preamp
- On the Wing, select the channel and bring up the input gain knob in the Preamp section of the processing tab.
- Watch the meter on your screen. You’re aiming for peaks that hit just where the green turns to yellow.
- Avoid peaking in the red at all costs; it means clipping is occurring.
Step 3: Repeat for Every Channel
- Do this individually for all vocals, instruments, pads, click tracks, playback machines—everything.
- Save your scene or snapshot once this is done. The Behringer Wing allows scene saving and recall for repeatability, especially helpful in regular worship team rotations.
How Gain Affects the Entire Mix
Misaligned gain doesn’t just make your mix harder—it sabotages it across multiple areas:
Fader Behavior:
Many engineers aim to keep channels near the “0” mark on the fader. Why? Because the scale of the fader is not linear—going from -50 to -40 dB results in a much larger perceived change than going from -5 to +5 dB. In other words, the top 25% of the fader allows for more fine-tuned control, which is critical in live mixing situations.Dynamics (Compression & Gates):
If your gain is too low, your compressor may not even trigger. Too high, and it compresses too much. Likewise, gates won’t open or close properly if the incoming signal doesn’t cross their thresholds.EQ Adjustments:
EQ decisions made on bad gain structure are misleading. You might cut or boost based on noise or distortion rather than the actual tonal content of the input.Stage Monitoring Systems (IEMs, Wedges, P16s):
One of the most overlooked aspects of gain staging is its impact on personal monitoring systems. If you change the gain after people have built their in-ear mixes, you’re affecting the relative mix balance in their ears or wedges, creating instant frustration and confusion for musicians.For example, if a vocal gain increases after the fact, it could suddenly overpower everything else in someone’s ears.
Avoiding Mid-Rehearsal Headaches
Changing gain after rehearsal has begun is one of the fastest ways to throw off your in-ear and monitor mixes. The band may have balanced their in-ears perfectly, only to have levels suddenly shift because the FOH engineer adjusts gains mid-way. This leads to confusion, wasted time, and sometimes frustration from the musicians.
The answer? Do it right from the start. Take 15 extra minutes to properly sound check, and you’re saving yourself—and your team—hours of frustration.
Final Thoughts
If you want tight, musical mixes that translate well to both FOH and live streams:
- Gain stage every input properly at the beginning of sound check.
- Don’t touch gain during rehearsal unless absolutely necessary, and if you do—warn your band.
- Use the visual meters to help guide your gain structure.
- Understand that proper gain staging unlocks the power and accuracy of the rest of your console’s tools.
In a church environment where volunteers are often at the helm, teaching and reinforcing proper gain staging is one of the most valuable investments you can make in your production workflow.